This is the blog. Click here to go to the Zenopus Archives website.

Note: Many older posts on this blog are missing images, but can be viewed at the corresponding page in the Internet Archive

FEATURED POST

The Forgotten Smugglers' Cave: Index of Posts

An index of posts describing the Forgotten Smugglers' Cave, an adventure for Holmes Basic characters levels 2-4.                    ...

Showing posts with label Adventures. Show all posts

Tuesday, June 11, 2024

Pacesetter Games: Islands of Peril


Cover of the standard edition

Islands of Peril is the latest adventure from Pacesetter Games 
written by Bill Barsh based on the 1970s maps and notes of J. Eric Holmes (with permission from the Holmes estate).  This follows last year's Things Better Left Alone dungeon adventure; read my post about that one here. I contributed a Foreword to this one, where I give an overview of the original maps that it is based on. Note that this one is a sandbox wilderness, and is the first of a two-part series of island-based adventures.

The adventure was released last weekend at North Texas RPG Con, where Chris Holmes is a regular attendee. To quote Pacesetter's announcement: 

"This year we bring you Islands of Peril: Book One. This massive island (wilderness) adventure includes five fully-detailed islands within Holmes' home campaign. Designed for Classic D&D using character levels 1-4, there are numerous sandbox style adventure locales on each of the islands. PCs can explore the Crying Cyclops Isle, Shadow Island, Isle of the Creeping Doom, Barrow Island, and Isle of Ash. Each features unique adventures and encounters within this first installment featuring the maps and notes from Dr. Holmes, the father of Basic Dungeons & Dragons.

We have three versions to choose from; softcover, hardcover, and special edition hardcover. In case you missed Things Better Left Alone last year, we have brought it back into print (it sold out last year at NTX). Available in both softcover and brand new hardcover edition.

Lastly, but most importantly, Chris Holmes, the son of Dr. Holmes, is attending the convention. Find him at the con or at our booth and have him sign your copy! Not only did he provide us with the original hand-drawn maps (included in each book), he contributed his artistic talents to the illustrations in each book.

If you cannot make it to the convention, look for the books at pacesettergames.com."

Find three different hardcopy versions of Islands of Peril, as well the PDF version, here on the Pacesetter games website:

Pacesetter Games: Islands of Peril


Thursday, June 1, 2023

Pacesetter Games: Things Better Left Alone


Things Better Left Alone. Cover at by Wonkee.


Things Better Left Alone is an adventure written by Bill Barsh and published by his company, Pacesetter Games, based on four original dungeon maps drawn by J. Eric Holmes, as well as the associated keys, which are mostly written directly on the maps but also include one additional page of notes.

These maps include the areas which Holmes drew on for his novel The Maze of Peril. I wrote about the correspondence between the story and these maps back in my Tales of Peril Book Club (sadly unfinished); specifically, see Scene 6 and Scene 7. If you'd like a copy of The Maze of Peril to read along with the adventure, the publisher is still selling copies from the original print run on Amazon.

This adventure was authorized by the Holmes family and includes art by Chris Holmes and Wonkee, as well as scans of the original maps and notes on which it is based, as well as modern renderings of the maps.

The adventure went on sale today in conjunction with the North Texas RPG Con. Print copies can be purchased directly from their booth at the con, but are also available on the Pacesetter games website, where there are two options: Print + PDF plus PDF alone. The PDF can be downloaded directly after purchasing. Find it here on DriveThruRPG:

Things Better Left Alone in Print or PDF


Tuesday, February 28, 2023

The Forgotten Smugglers' Cave: Draft Map


Draft Map. Click for a larger, clearer view that you can drag to your desktop


Above is my draft of a complete map for the Forgotten Smugglers' Cave adventure, showing entire complex, Areas 1-25. North is up, and each square is 10 feet. Area 16 is cut off at the bottom because the entire chamber is 300 feet in length, north to south. 

This map was made in Excel (it's a spreadsheet!), with a grid set to 10 squares per inch. I hope to make another version in Inkscape once I have some time to reacquaint myself with the program. But for the time being, I'm using this draft version to play test the dungeon, and hopefully it will be sufficient for anyone else to run it, should they wish. 

Click on the preview image above to see the larger image, which should be much clearer. You can drag that image to your desktop and print it out. When printing, set to "Print Entire Image" or 63%, which should scale it to fit on a single page.

Note that some of the descriptions in the areas may not match the map right now; I plan to go back and edit the room descriptions to match what is shown on the map.

Evening Update:

I've already updated the map twice since originally posting it. I've noticed a few errors, and added a few more features, a title & a compass, and made the numbers more prominent.

Friday, February 10, 2023

The Forgotten Smugglers' Cave #25: Crypt of the Arch Smugglers

This is an installment of a new adventure for Holmes Basic D&D. You can find the Introduction to the dungeon here: Area 1.

Each entry includes part of a "pointcrawl" map showing the area & any exits, which include links allowing you to navigate the dungeon:


 25. CRYPT OF THE ARCH SMUGGLERS

S
H
H
H
 
Area 24


(H = ladder up)

25. CRYPT OF THE ARCH SMUGGLERS. This was the final resting place for the leaders of the smugglers. Major features include an entry ladder, a tunnel, a door, and a crypt chamber holding a sarcophagi.

Entrance. The only way in to Area 25 is via the ladder down from the hidden space in the central block in Area 24. The ladder consists of metal rungs anchored in stone. The vertical shaft is 3 feet wide, with the ladder on the west wall, and goes down 30 feet until it reaches the south end of a 10 foot wide tunnel. This tunnel extends north for 40 feet, with walls covered with the skulls of orcas and other toothed whale, each mounted in lime plaster. 

Whale Skull Door. At the north end of the tunnel is a stone door, on which is mounted the largest of the skulls, which is that of an enormous toothed whale. The walls adjacent to each side of the door are lined with orca skulls. 

The door is locked and heavy. Opening the lower jaw of the whale skull will reveal a stone trigger plate set in the middle of the door. However, pushing this trigger without first unlocking the door with the appropriate key (found in the desk in Area 25), will cause the jaws to snap shut, delivering 1d6 damage to anyone reaching in. 

The keyhole to unlock the door is within the mouth of the centermost orca skull to the right of the door. Keeping it unlocked requires holding it place once it is turned counterclockwise. 

Finally, pushing the door open will require a combined strength of 30. 

Thus, opening the door safely will require three or more individuals: one to hold the key in a turned position in the keyhole, one to push the trigger plate, and one or more others to add their strength in pushing the door open.

Crypt Chamber. Beyond the door is a room 30 feet wide and 60 feet long, with no other visible exits. Decorated bronze sarcophagi, each set upon a plinth, stand upright, anchored to the walls. There are 6 along the west wall, 3 along the north wall and 4 along the east wall. These run in order from oldest to the most recent arch smuggler, with the oldest being the southernmost one on the west wall, and the newest being the southernmost one on the east wall. This one contains the corpse of the most recently interred chief, Mot Daxor, who usurped Ness Sentra (see Area 13).

Sarcophagi. The front of each sarcophagus is tightly fitted to the body, but can be pried off with an iron spikes or crowbar.

Inside each stands a withered corpse, bound in place, and wearing decaying fine leather armor and a belt with a cutlass in a decorated scabbard. Nothing will happen unless the contents (corpse or cutlass) of a sarcophagus are disturbed, in which case a green smoke will begin issuing from the mouth of the corpse, coalescing in 2 rounds into a churning humanoid form that will advance on the nearest living creature in an attempt to drain its life force.

Corpse Fog (13): DX 9, AC 5, HD 3*, hp 8, AT 1 touch for 0 damage but energy drain (one level), SD immune to normal weapons, draining adds one HD; turning dependent on HD (3 HD = wight, 4 HD = wraith, etc). Successful turning will send the fog back into its corpse.

Each fog starts with two HD, but adds a HD for each level drained from a party member. Roll for the additional hit points gained. Destroying one will result in a blast of smoke that will do 1d6 damage to all in the chamber but will also restore any levels drained by that fog.

The corpses are otherwise safe to touch. Each scabbard and cutlass is worth at least 500 gp, and each cutlass has a 1 in 2 chance of being a magic weapon (roll again, 1-3 = +1, 4-5 = +2, 6 = +3).

If the Shade of Mot Daxor is defeated, and his remains replaced with those of Ness Sentra, the players will lift the curse and gain her treasure (Area 13). Sentra's ghost (a reinvigorating spirit) will appear here briefly and thank the players, restore up to four drained levels, and then fade away.

Chronologically on this blog, the previous installment described Area 24

HERE ENDS THE FORGOTTEN SMUGGLERS' CAVE

Monday, January 23, 2023

The Forgotten Smugglers' Cave #24: Smuggler Catacombs

This is an installment of a new adventure for Holmes Basic D&D. You can find the Introduction to the dungeon here: Area 1.

Each entry includes part of a "pointcrawl" map showing the area & any exits, which include links allowing you to navigate the dungeon:


Area 25

H
H
H

S
(H = ladder down)

 24. SMUGGLER CATACOMBS 

S


S
 
Area 21


24. SMUGGLER CATACOMBS. This is where ordinary smugglers without families were once laid to rest. The area includes an entry stair, an antechamber, and four sets of tunnels leading to ossuary chambers.

Entrance. The only way into this area from the greater cave complex is via the secret door in the north wall of Area 23, which opens on to a 10 foot square landing. The north side of the landing opens onto a set of stone steps going down 20 feet to another landing of the same dimensions. 

Skull-Covered Door. Strikingly, the three walls of the lower landing are covered with a multitude of elongated, pointy-toothed skulls (from seals and sea lions), adhered to the walls with a shell-based lime plaster. The north wall of this area actually contains secret door, which can only be opened by depressing two catches, each inside the mouth of a different skull. This will require placing a hand inside each of the correct skulls and pushing hard (13 strength required). Once inside, the door will slowly swing shut again unless held or propped open.

Antechamber. Beyond the skull door is a square chamber, 50 feet to a side, with a large square stone block (10 by 10 feet, 4 feet high) in the center of the chamber and two doors on each of the east and west walls. 

In the southeast corner is a set of four shelves holding folded burial shrouds. Hidden in the folds of one shroud on the bottom shelf is a single green eye agate (100 gp value).

In the southwest corner is a tightly-lidded stone bin that is half-filled with lime, rock-hard with age. Completely embedded inside this is a silver ladle (worth 50 gp).

Resting Block. The large block, which is covered in polished marble tiles, is where the newly deceased were briefly left in repose prior to interment. The tiles are all smooth squares, large in size (2 by 2 feet), except for rectangular tiles encircling the top edge which are etched with a skull motif. On the north-facing side of the block, the center tile at floor level can be removed to reveal a space within the block with a ladder leading down to Area 25.

Doors. The four doors, two east and two west, are each made of bronze, and locked (there are two keys that can open these doors, one in Area 5 and one in Area 21). If opened and then left unattended, each door will slowly swing shut and re-lock.

Tunnels. Each door leads to a catacomb tunnel having the same dimensions: 10 feet wide, 10 feet high and 100 feet long, ending at another bronze door, also locked.

Resting Niches. Carved into the north and south walls of each tunnel are resting niches, where bodies were left for a longer period of time as they decomposed. These are placed every ten feet, for a total of twenty per tunnel. Each contains three shelves, of which 0-3 (1d4-1) are occupied by what appears to be body-shaped bundle, for a total of 20d4-20 bundles per tunnel. Each bundle is wrapped in a crusty, lime-coated shroud.

Skeletons. Removing the shroud from a bundle will reveal a skeleton with glittering green eyes, which is an agate-eyed skeleton. The skeleton will not animate unless further disturbed, but whoever removed the shroud or is within 5 feet must save versus magic to avoid falling asleep for 1d6 turns from gazing at the eyes, and cannot be awakened earlier short of Dispel Magic.

Each eye is actually a rare green eye agate from a far off land to the north, and worth 100 gp (and optionally will increase hit point recovery while sleeping; see Area 3). The agates were placed in the skeletons by the smugglers and the strange energies of the underworld endowed the skeletons with a form of self-protecting animation.

Damaging a skeleton will cause that skeleton, if not destroyed, to immediately animate and attack. Each round thereafter, 1d6 skeletons in the same tunnel will throw off their shrouds and animate, until all skeletons in that tunnel join in. Once animated, characters no longer need to save versus sleep. The skeletons will cease attacking if the characters leave the area.

If a skeleton is simply moved, it will not animate for one round, and if during this time it is placed in one of the ossuaries at the end of the tunnel, will not animate or cause the others to do so. Once placed in an ossuary, the agates can be safely removed.

If a character attempts to remove an agate without disturbing the skeleton, there is a small chance of success. The base chance is equal to the attempting character's dexterity (e.g., a 10% chance for a dexterity of 10). Thieves add their chance of removing traps to this (e.g. a thief with a 15 dexterity and a 15% chance of remove traps would have a 30% chance). If this roll is failed, the eye is removed but the skeleton then animates as if damaged and will incessantly attempt to retrieve its eye, to the point of relentlessly stalking the offending character. Removing a second eye agate from the same skeleton will automatically cause it to animate. If the eye(s) are returned it will stop stalking and return to its resting place.

Agate-Eyed Skeleton (20d4-20 per tunnel): DX 12, AC 7, HD 2, hp 9, AT 1 bony hands for 1d6, SD when at rest, gazing at eyes causes sleep (save versus magic); when animated, turned as a ghoul.

A full write-up of this new monster can be found here.

Ossuary Chambers. Each tunnel ends in a bronze door leading to a smaller square chamber, 20 feet to a side, which were the final resting places for the bones of deceased smugglers. 

The walls are also lined with shelves carved into the stone, but here the shelves hold ossuaries consisting of small coffin-like boxes made of stone, heavily lidded, and fixed in place on the shelves. If a lid is removed, the ossuary will either be found to contain old bones or be empty.

While many of the ossuaries are filled, in aggregate there is sufficient space to hold all of the bones of the skeletons remaining in each tunnel. As indicated above, if the bones of a skeleton are carried to a chamber and placed in an ossuary within one round of being disturbed, it will not animate and the agates in its skull can then be safely removed.

Chronologically on this blog, the previous installment described Area 23 and the next posted installment will be Area 25.

Sunday, January 15, 2023

The Forgotten Smugglers' Cave #23: Shrieking Pool

This is an installment of a new dungeon adventure set in the Portown milieu, which I'm writing for Holmes Basic D&D. You can find the Introduction to the dungeon here: Area 1.

Each entry includes part of a "pointcrawl" map showing the area & any exits, which include links allowing you to navigate the dungeon:


Area 7  C==  23. SHRIEKING POOL 
 ==S  Area 22


23. SHRIEKING POOL. This natural cavern, with irregular walls, stalactites and stalagmites is much longer than it is wide (about 110 feet by 30 feet), and is bisected by a pool of water about 20 feet across, fed by water dripping steadily from the ceiling. On each side grows a profusion of oversized mushrooms, some of which are up to 3 feet in height.

Exits. There are two exits: at the west end, a narrow and but mostly walkable tunnel (3 feet wide, 6 feet high) leads 180 feet to the back of the niche in Area 7, and at the east end, a narrow tube (3 feet wide and 3 feet), which must be crawled through, leads 170 feet to the back of the secret door in Area 22.

Mushrooms. The mycoflora grows within 10 feet on either side of the pool. While most are harmless, the colony includes several shriekers, which will begin shrieking for 1d3 rounds in the presence of light or movement. There are 6 shriekers total; assume 1d6 are one side of the pool and the rest are on the other.

Shriekers (6): DX 1, AC 7, HD 3, hp 11, AT 0, SD shrieking. 

If the colony is inspected closely, it will be noted that several mushrooms near the edges of the water appear to be partially melted.

Pool. The pool is broad (30 feet north-south by 20 feet east-west) but shallow (only six inches deep). It can forded easily, but is home to a Large Grey Ooze, which normally survives on the mushrooms as well as vermin that drink from the edges of the pool. It generally rests on the shore or a cavern wall just above the water line, camouflaged as stone, but when alerted by the shrieking it will settle on the bottom of the pool and wait. There is only a 2 in 6 chance it will attack a character standing at the edge of the pool, as they are much bigger than its typical prey, but there is a 5 in 6 chance it will attack anyone passing through the pool. 

Large Grey Ooze (1): DX 3, AC 8, HD 3, hp 21, AT 1 strike for 2d8; SA dissolves metal; SD immune to cold and fire; weapons will damage but have 50% chance of breaking due to corrosion

Chronologically on this blog, the previous installment described Area 22 and the next posted installment will be Area 24.

Wednesday, August 17, 2022

The Forgotten Smugglers' Cave #12: The Bubbly

This is an installment of a new dungeon adventure set in the Portown milieu that I'm writing for Holmes Basic D&D. You can find the Introduction to the dungeon here: Area 1.

Each entry in the series includes part of a "pointcrawl" map showing the area & any exits, which include links. Thus, you can navigate the dungeon by following the links on the map:


Area 11 === 12. THE BUBBLY
C== Area 18
D
||
E.P.W.
12. THE BUBBLY. This area consists of a large natural cavern with a floor of sand and stones from which bubbles forth the source of the water for the stream of Area 11 and eventually the waterfall of Area 9. The PCs can enter from the west by heading upstream through the stream from Area 11 or from the east via the tunnel from Area 18.  

The Cavern. A large roughly circular space, about 100 feet in diameter, and dimly lit by phosphorescent fungus growing on the rock walls, which arch to a point about 50 feet above the floor, which is covered in deep, dark grey sand intermixed with a variety of pebbles.

The stream exiting via the west wall leads up to pool of churning water and sand with a diameter of 10 feet, fed by water continuously bubbling up from beneath. The output from this forms a stream which exits the room through the western wall to Area 11.

Concealed Tunnel. If the walls are examined, a crevice will be noted just above the sand on the eastern wall. The sand here conceals a tunnel below floor level leading to Area 18. Enough sand can be removed in 3 turns to allow entry to the tunnel. 

The Source. 30 feet beneath the surface of the bubbling pool is a nexus with the Elemental Plane of Water. At this nexus dwells a slurry, a minor elemental composed of a mixture of water and sand, which dwells here, feeding on precious metals found on the Prime Material Plane.

Slurry (DX 15, AC 2, HD 2, HP 9, #AT 1 blast of watery sand for 1d6, SD immune to normal weapons). A full write-up for this new monster can now be found here.

Anything heavy that is thrown or dropped into the churning water will sink and then either be ejected in 1d6 rounds (1-9 in 10) or pass through the nexus to the Elemental Plane of Water (on a 10). This will have a 3 in 6 chance of causing the slurry to surface in the middle of the pool, and begin spraying anyone in the area with a concentrated blast of sandy water until they leave.

If a character enters directly into the churning water, they will take 1 point of damage per round from the abrasive force of the sand in the water.

If the elemental is destroyed, the nexus to the Elemental Plane of Water will close, causing the water flow to diminish to a trickle.

Star Quartz. The churning watery created by the slurry acts like a rock tumbler, polishing quartz stones found naturally in the sand, producing the round star quartz found in the area and downstream. Searching the sand around the pool for a turn gives a 1 in 6 chance of uncovering such a gem (roll on the Gems table for value), but also a 1 in 6 chance of disturbing the elemental.

A gem dropped into the pool has a 1 in 6 chance of resurfacing at the next higher value on the Gems table. Adding gold or platinum (10 GP worth) will increase this chance to 4 in 6, but only once per day.

Chronologically on this blog, the previous post installment was Area 11 and the next posted installment will be Area 13.

Saturday, August 13, 2022

The Forgotten Smugglers' Cave #11: Stream Tunnel

This is an installment of a new dungeon adventure set in the Portown milieu, which I'm writing for Holmes Basic D&D. You can find the Introduction here: Area 1.

Each entry includes part of a "pointcrawl" map showing the area & any exits, including links allowing you to navigate the dungeon:


Area 13
||
Area 9 === 11. STREAM TUNNEL
=== Area 12
11. STREAM TUNNEL. This area consists of a long east-west tunnel, carved by water, that contains the stream feeding the waterfall in Area #9, and a narrow path running along its southern side.

The Path. This begins at the top of the waterfall in Area #9, and extends east, with an average width of 5 feet. The low ceiling is only 5 feet above, and the rough rock of the walls is slick with moisture, and dimly lit by patches of phosphorescent fungus. The adjacent stream is 10 feet wide but only 5 feet deep, and swift, chilly, and slippery, requiring a dexterity of 15 to remain upright.

The stream and path continue east in the same manner for several hundred feet [exact length to be confirmed by later explorers...], until the path abruptly narrows to one foot and stops.

There are no permanent residents in this area, but Wandering Monsters may be encountered.

The Ford. 10 feet past where the path ends, there is an opening in the tunnel wall on the opposite side, several feet above the level of the water. Thus, the stream may be forded here by wading upstream for 10 feet through the chilly water.

Unaided, the crossing will impossible for anyone with a dexterity of less than 15. However, at the point where the path ends, an old iron ring has been fixed into the rock near the floor of the south wall, and a bit of old rope remains attached. Another ring is attached to the rock on the north side near the opening 10 feet ahead. Thus, the two rings can be connected by rope, allowing anyone to safely cross.

Past the opening on the north side, the stream continues for another 30 feet before opening into a larger natural chamber with a sandy floor (Area 12). Again, the water in this passage requires a high dexterity to traverse. As the chamber is approached, the water and bottom of the stream grow increasingly gritty and sandy, respectively. 

While fording the stream, a character has a 1 in 6 chance of stepping on what feels to be a round rock, but is actually a highly polished star quartz gem worth 1d10 x 10 gp. Roll 1d6 for color: 1-3 = blue, 4-5 = green, 6 = rose. Up to six such gems can be located by searching the bottom, two per 10 foot section at the ford and beyond.

Exits. There are three exits from this area, west (downstream) from the south side of the stream to Area 9, north across the stream to Area 13, and east (upstream) to Area 12. The map posted above can be used to navigate to these areas.

Chronologically on this blog, the previous post installment was Area 10 and the next posted installment was Area 12.

Tuesday, April 5, 2022

Gary Con 2022: Day 2


DMing "Expedition to Skull Stack Crater".
Photo by Gary W.

This post covers the gaming highlights of my second day at Gary Con XIV, Friday the 25th. If you missed it, the report for first day can be found here.

In the morning I ran Expedition to Skull Stack Crater, a newly revised version of a scenario that I originally ran for my son and his cousins more than five years ago, and had planned to run at Gary Con in 2020 before the pandemic unfolded. The setting is inspired by the various skull-faced dungeons and mountains of fiction, including of course the Skull Mountain cross-section of the Holmes Basic rulebook, but is an original location rather than a writeup of something pre-existing. You can read the introduction from the convention program here.

The pre-generated characters for this adventure are 3rd level, so it mostly uses the Holmes rules, with any higher level material filled in from OD&D. There were six players which is pretty much optimal for a con game. Several I knew previously, including Demos from OSR Grimoire and Larry from Follow Me and Die!, each of whom played in my Zenopus sequel at the last in-person Gary Con in 2019. And I'd exchanged forum posts with two others that I met here for the first time, James and Gary. The game fun was run and ran well with this fairly experienced group, who finished just before our time was up. I plan to revise this scenario and make it available on DrivethruRPG. Demos briefly mentions the game in his Gary Con recap here, and Larry shows off another photo from the game here.


Mike Carr refereeing Don't Give Up the Ship


In the afternoon I played in the annual session of TSR's Don't Give Up The Ship, refereed by Mike Carr, who co-authored the rules with Gary Gygax and Dave Arneson. Carr is also well known to aficionados of Holmes Basic as the author of the module B1 In Search of the Unknown, the first Basic module ever published, and one of only two written for specifically for the Holmes set.

The DGUTS game took place in the Legends of Wargaming hall, and the large group of players - over 20 (!) - sat on chairs in a ring around a large blue sheet, representing the sea, where Carr carefully crouched or lay to manipulate the ships after receiving our written orders each turn. The scenario this time was an engagement between the French and British fleets during the Napoleonic era, specifically 17 October, 1812, and the players were divided evenly between the two sides.


My "Ship Data Sheet" & mini for the game

I played Andre Cheviot, captain of the French frigate Nereide, although these details were simply flavor as resolution of actions relied solely on movement orders, opportunities to fire, the ship's stats and dice rolls. The game moved slowly with so many players; in the five hours scheduled for the game I think we only finished 6 turns, but it was fun to participate in one of the more unique centerpiece events of the con. 


Gary Con XVI GM's Cup,
featuring Geezel from Snarfquest


Towards the end of the game I ducked out into the hall to fill up on Spotted Cow beer from one of the Happy Hour stations, so this is a good point to show off my GM's Cup featuring art from Larry Elmore's Snarfquest comic, which ran for years in Dragon magazine in the mid-1980s. Other cups available this year featured Telerie and Snarf himself. Elmore was a guest at the con once again this year, and there was even a Snarfquest 5E D&D game as an event.

My last game of the day was part of the Legends of Roleplaying Tournament, an annual AD&D tournament organized by Paul Stormberg. For each one, Paul develops a scenario derived from old school material; for example, 2019 featured a sequel to the module B1 that was newly co-written by Paul and Mike Carr. This year's scenario was listed as "Depths of Terror", a level hidden deep within Gary Gygax's Castle Greyhawk. However, as a surprise, it actually turned out to be an expanded version of The Tomb of Ra-Hotep, a 1970s dungeon by Alan Lucien that Gygax hid in part of Castle Greyhawk, and which inspired Gygax's own Tomb of Horrors. The version for the tournament was expanded by Paul from the original together with additional vintage campaign material supplied by Lucien. Paul later indicated on Facebook that he plans to publish this version soon.

I joined a team of ten players who drew Steve Winter, former TSR employee, as our DM. I've played in Steve's games a number of times, including the in-person tournament in 2019. My group this time was very clever, and did a great job with the riddles and devious traps, placing 5th out of the 13 teams, and only a few points behind another team.


Dave and I after his game,
photo by one of the other players.

After the tournament ended, I stopped by to say hi to Dave W. of RPG Retro Reviews, who was running a 6-hour session of the original Tower of Zenopus dungeon using the Holmes Basic rules. I had met Dave in person back in 2020 when he played in my Zenopus sequel at the second Scrum Con


The strong Halfling; note this is after leveling,
so the level should be 2, not 1


By the time I arrived, another player had already left, so I ended up running his PC, a halfling with 18 strength (!), for the last hour of the game. He was mostly silent during my time due to my knowledge of the dungeon. The party had already rescued Lemunda, earning her father the mayor's favor, but I witnessed showdowns with the flying dagger (which killed a PC), the ghouls, and the evil thaumaturgist. I always enjoy see other folks spin on this ur-dungeon. 

This report continues with Days 3 and 4.

Tuesday, August 10, 2021

The Forgotten Smugglers' Cave #10: Driftwood Hermitage

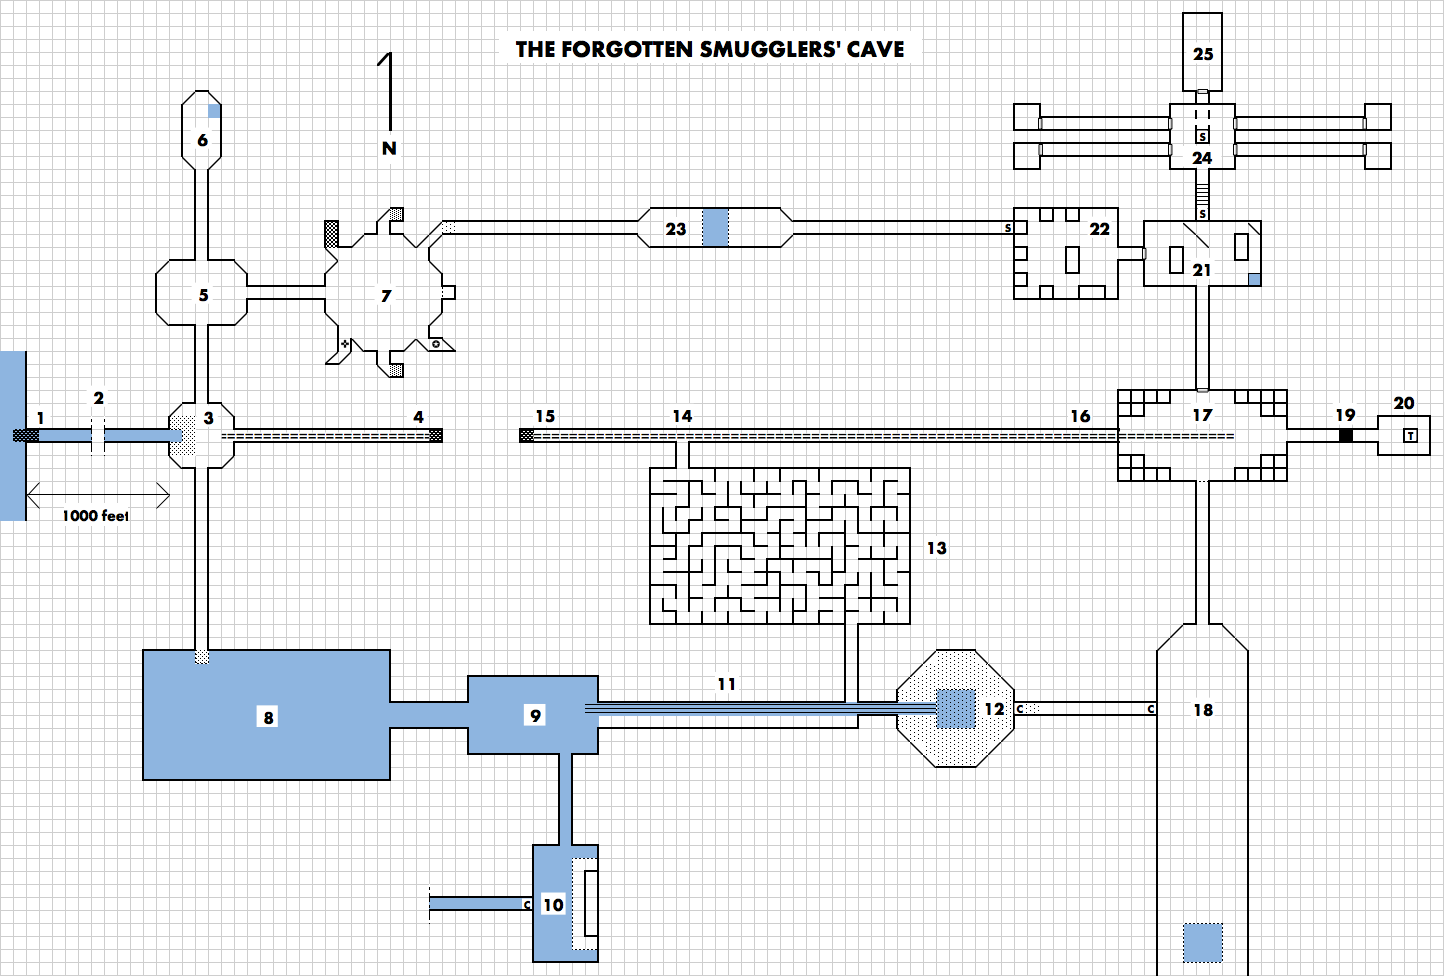
This is an installment of The Forgotten Smugglers' Cave, which starts at Area 1.


Area 9


||


Sea  ===C  10. DRIFTWOOD HERMITAGE

(C = concealed)

10. DRIFTWOOD HERMITAGE. This water-filled cavern is the home of a were-shark that lairs in a hut on a ledge on the eastern side.

Entrance. The only practical way to enter this cave is via the half-water-filled passage from Area 9 to the north. This passage opens up to the north end of a large natural cavern, dimly lit during the day via cracks in the ceiling, and also filled with water. The cavern is 50 feet wide (east-west) and extends 90 feet to the south. On the eastern side, a wide rock ledge rises two feet from the water, and on this rests a large wooden hut built against the cavern wall. The ledge extends twenty feet out from the wall. 

Underwater TunnelThe only other exit from the cavern is submerged ten feet beneath the surface of the water in the west wall, where a ten-foot wide underwater tunnel leads several hundred feet to the west to the sea.

Water and Inhabitants. Throughout the cavern, the water is 20 feet deep, and anything entering it will attract the attention of 4 cave sharks that lair here in association with the were-shark. From a watercraft, there is a 2 in 6 chance each turn of spotting the back fin of one briefly breaking the surface. If anyone enters the water, they will begin circling them, but will not attack unless the person is already injured or Mar Nes summons them to his aid. 

Cave Sharks (4): DX 12, HD 3 (hp 12), HD 2 (hp 7, 8), HD 1 (hp 4), AC 6, AT 1 bite for 1d6

If the PCs enter during the day, roll a d6 to determine where Mar Nes the Hermit, a former crabber who is now a were-shark, is currently located:

1-3: in the shelter, asleep.

4: in the shelter, awake.

5: swimming underwater, and immediately aware of the party.

6: out of the cavern, with a 1 in 10 chance of returning each round.

At night, Mar Nes will typically be out in the sea hunting for fish.

Ledge and Hut Exterior. The ledge rises nearly straight from the bottom, so a boat can easily be pulled up alongside it. 

On closer inspection, the hut is built from large driftwood and decorated with a variety of sea shells. At one end sits at pile of old crab traps. A curtain of old ropes serves as a door, to the back of which are tied several buoy bells that will clang loudly if passed through.

The Hermit Crabber. If the hut is approached and Mar Nes is awake, or awakened by someone attempting to enter, he will cry out that they should speak through the door as he has a contagious skin disease (e.g., leprosy). This is not true, although his rough skin does have an unnatural grey tone. He will also give a fake name (Grink) that townsfolk will not recognize, and claim to have climbed down here years ago through a crack in the ceiling that is no longer accessible.

While not pleased to have his lair discovered, Mar Nes is inquisitive and will try to learn more about the PCs by acting the part of a hermit. He will trade information about the caves for food (other than seafood) or alcohol. Being a smuggler in his youth, he knows the general layout of the cave system prior to the cave-ins, including the tunnel above the waterfall in Area 9. He also knows of the Sea Changed in Area 8, which he avoids, and how to slow the change with daily application of vinegar.

However, if any character possesses the unholy symbol from Area #7, there is a 1 in 6 chance each round that it will trigger Mar Nes changing into were-shark hybrid form and charging forth in an attempt to take it.

In truth, after decades successfully crabbing out of Portown, Mar Nes was bit by a were-shark when pulling up a crab trap. He fended it off with his lucky silver knife, but was infected with lycanthropy. Abandoning town, he remembered these caves and found this spot to lair in, hunting for fish in the sea at night. Due to his force of personality, he has maintained a fair degree of control over his lycanthropy. He occasionally returns to Portown in human form to sell old treasures from shipwrecks for money for his family, and to bring pretty seashells to his beloved young great-granddaughter.

Mar Nes the Were-shark: DX 6 on land, 15 in water, AC 5, HD 4, HP 26, #AT 1 bite for 2d6/1 tail slap (only against a second opponent) for 1d6 plus drop anything held on 1-2 in 6), immune to normal weapons in shark or hybrid forms

A full monster entry for were-sharks can be found here.

Hut InteriorInside are rough furnishings, including a sleeping mat and sitting logs. Hidden behind a loose rock in the back wall is a cavity holding a barnacle-encrusted gold brooch worth 50 gp, or double that if properly cleaned, several seashells, and an oilskin wrapping holding drawings made by a young child.

There is only one above-water exit from this area, which is the passage from Area 9. There is also a tunnel concealed underwater that leads west several hundred feet out to the ocean.

Chronologically on this blog, the previous post installment was Area 9 and the next posted installment will be Area 11.

Friday, May 14, 2021

The Forgotten Smugglers' Cave #9: Waterfall Cavern

This is an installment of a new dungeon adventure set in the Portown milieu, which I'm writing for Holmes Basic D&D. You can find the Introduction here: Area 1.

Each entry includes part of a "pointcrawl" map showing the area & any exits, including links allowing you to navigate the dungeon:


Area 8 === 9. WATERFALL CAVERN
=== Area 11
||
Area 10

9. WATERFALL CAVERN: The water-filled passage from Area 8 opens into the west end of this natural cavern, also filled with water. The ceiling throughout this cavern is covered with a profusion of dripping stalactites. There is no natural light, but even at the far west end the sound of running water to the east can be heard over the dripping water. 

The source of this noise is a waterfall at the eastern end of the cavern, 100 feet away. The water streams out of a 10' diameter cave mouth and falls about 15 feet to the surface of the water in the cavern. The cavern turns south near the waterfall, leading to another passage to Area 10 (to be described).

Drop-ins. Dwelling amongst the stalactites here is a colony of giant rock crabs (1d3), which typically feed by dropping on fish in the water, but are not averse to broadening their diet. 

For each round spent in the room, there is a 1 in 12 chance of an attack by one crab (up to the total number). This will surprise on 1-5 in 6, If so, roll an attack against a random character. On a miss, there is still a 25% (3 in 12) chance that it instead hits and damages the watercraft the character is in. If combat goes against the crab it will scurry over the side of the boat into the water.

Giant Rock Crab (1d3): DX 3, AC 1, HD 2, hp 9, AT 2 claws for 1d8 each or drop for 1d12.

WaterfallCareful inspection of the area around the waterfall will reveal, on the right hand side, a series of handholds that lead up 15' to a narrow path next to the stream feeding the waterfall. At the base of these handholds, near the water, an metal rod has been driven into the rock, and can be used to tie up a boat.

The handholds are slick with moisture, but any thief can easily make the climb without chance of falling. Other characters will have 75% chance of reaching the top without slipping; if they do they will either fall back down into their watercraft, if it remained directly below, or into the water, which is cold and 15 feet deep.

At the bottom of the water, directly beneath the handholds, stands an upright suit of archaic bronze plate mail +2 (AC 2), holding the skeletal remains of a warrior who long ago fell from above and sunk here. The suit is completely covered in grime but fully intact due to its protective magic and being bronze, and a good cleaning is all that is needed to restore it.

There are two exits from this area, a prominent one to the south and a concealed one to the east, which can be found by following the links on the above map; if there is no link, the area is not yet posted.

Chronologically on this blog, the previous post installment was Area 8 and the next posted installment will be Area 10.

Friday, March 5, 2021

The Forgotten Smugglers' Cave #8: Reef Cavern

This is an installment of a new dungeon adventure set in the Portown milieu, which I'm writing for Holmes Basic D&D. You can find the Introduction to the dungeon here: Area 1.

Each entry includes part of a "pointcrawl" map showing the area & any exits, which include links allowing you to navigate the dungeon:
 
Area 3
 
||
 
  8. REEF CAVERN  
 === Area 9


8. REEF CAVERN: The tunnel south from from Area 3 (Grotto) slopes gently down to this area. Any thief passing through it will recognize faint markings in smugglers' code indicating danger in the water. The passage opens up to a rocky beach, smaller than the one in the Grotto, on the edge of a much larger water-filled cavern (roughly oval-shaped, 200' east-west, 100' north-south).

The cavern is dimly lit by weird purple and green lights shimmering beneath the surface of the clear, gently-rippling water, the source of the light being an expansive cold-water reef of glowing, strangely-shaped corals, among which dart a variety of creepy but harmless fish. From the shore, the bottom rapidly drops off to a depth of about 15 feet. To the east, a hundred feet across the water, is a darker area where it looks like there may be an exit. The water is cold and brackish, being a mix of fresh water coming from the east and sea water entering through unseen underwater passages. 

The rowboat from Area 3 will travel 10' per round with 1 or 2 people with improvised paddles, or 20' with 3 or 4 paddling. However, unless it has been re-waterproofed, such as with the pine pitch in Area 7, it will leak and sink within 5 rounds, or 10 rounds if 2 or more characters continuously bail. The empty barrels from Area 7 can be paddled at only 5' per round, but will not leak. If anyone enters the chilly water, purposefully or not, assume they can swim adequately in normal clothing (10' per round) or leather armor (5' per round), but sink in metal armor, with a 50% chance each round to remove it, or take 1d6 points of damage from drowning (these rules are adapted from those in the Sample Dungeon).

Ch-ch-ch-ch-changesScattered about the reef are a dozen of the the Sea-Changed (link goes to the full write-up for this new monster; abbreviated stats are below), ordinarily quiescent. However, any activity that disturbs the water may attract their attention; throwing rocks only has a 1 in 12 chance, but each round of boating or swimming has a 1 in 6 chance. If so, 1d4 of the Sea-Changed will rise to the surface and attempt to inflict "the sea-change" on the living (which happens on a successful hit followed by a failed save versus poison). Once a character is inflicted, no more attacks will be made on them; if all characters are so affected, the Sea-Changed will return to the bottom. The change causes the loss of one point of dexterity per day as the calcification spreads, and upon reaching zero, the victim will be transformed into one of the Sea-Changed, and then drawn back to the reef.

The Sea-Changed (12): DX 6, AC 5, HD 1+1, AT 1 claws or weapon, D: 1d6 + save vs poison or inflict calcification (lose 1 point of dexterity per day until transformed into one of the Sea-Changed), undead (turned as zombie; any that are successfully turned will return to quiescence in the reef); 1 in 10 have pearlescent eyes (roll on the gem table for value).

The Sea-Changed by Lore Suto

Crusty Bones Locker.  Barely visible in the middle of the coral reef is an ornate, padlocked chest, so covered in calcifications that it has become an immovable part of the reef. Even if unlocked, the lid will not open; the only way to get at the contents is to smash through the top. Inside is a mixture of 500 gold coins (500 g.p.) and 50 small pearls (10 g.p.), one of which is a red pearl (heals 10 HP once per day; fighters only; from the Blackmoor Supplement).

There are two exits from this area, north and east, which can be found by following the links on the above map; if there is no link, the area is not yet posted. 

Chronologically on this blog, the previous post installment was Area 7 and the next posted installment was Area 9.

Sunday, February 7, 2021

The Forgotten Smugglers' Cave #7: Dry Storage

This is an installment of a dungeon adventure set in the Portown milieu, written for Holmes Basic D&D. You can find the Introduction here: Area 1. Each entry includes part of a "pointcrawl" map showing the area & any exits, which include links allowing you to navigate:

■ Area 23
Area 5 ===  7. DRY STORAGE 

(the black squares represent the niches described below)


7. DRY STORAGE: A large cavern, and very dark; entering from the west with a light source will reveal a circular space with irregular walls, a dry stone floor, and scattered rubble, the largest of which is an immense fallen stalactite in the center of the room. No other exits are clearly visible, although the rough walls create many shadowed areas (which hide a number of niches; see below). Rusted torch sconces are attached to the wall on each side of the entrance to the room.

Fallen Stalactite. Lying on its side in a northwest (base, 5 feet wide) to southeast (tip, 3 feet wide) direction, this massive cylindrical rock is roughly 10 feet long. The chamber is sufficiently large to walk all of the away around it. On the far side from the entrance, a pair of skeletal legs wearing cavalier boots protrude from beneath the stalactite --- apparently those of someone who was caught underneath when it fell. The legs point out toward the shadowed niche in the northeast corner (see below).

The stalactite can be lifted just enough to pull the skeleton out by several characters with a combined strength of 60 (e.g., four each with 15 or greater strength), or by any two characters of average strength (11 or greater), each using a lever (see the north niche below) placed on a suitable fulcrum (e.g., a piece of rubble). The upper torso of the skeleton remains somewhat intact due to a slight depression in the floor, and looped around the neck is a silver chain (value 100 gp) with an iron key that will open the door to Area 21.

Niches. Closer examination of the walls will reveal a number of niches, which were used by the smugglers to store supplies. There are a total of seven large niches (marked by squares on the map above) in locations roughly corresponding to the following compass points: 

NW, N, NE, E, SE, S, SW
(click to jump to the description of each below)

    a. Northwest. The niche in this direction is at floor level and large enough to walk into, but after five feet the back slopes down for about ten more feet before ending, and this area is filled with the discarded remains of crates, bins, jars and jugs, which once held various supplies of food and drink. A search of the junk for one turn will yield one intact and tightly-sealed jug of vinegar (formerly apple cider).

    b. North. This shelf-like niche is about two feet off the ground, and on the shelf lies a row of iron tools, all rusty but usable, including an adze (for shaping wood), an auger (for drilling holes), two hammers, a maul and three 5' long digging bars, which could be used for levering up the fallen stalactite (see above).

        Beyond the tools, the niche continues for 5 feet and then narrows to a tunnel large enough for a human to crawl through, one person at a time, but ending in rubble after 15 feet. The rubble can be cleared out in 1d4 turns, but doing so will only reveal a dead end of solid rock.

    c. Northeast. This large niche is just a few inches above floor-level, and holds large pile of mouldering ropes and a bunched-up canvas sail. Hiding in the folds of the sail is a Huge Aggroach (see writeup of this new monster here). If disturbed, the aggroach will attempt to scurry to the back of the niche, where it will hide among the rubble ten feet back (see below), and then bite at anyone who bothers it there.

        Huge Aggroach (1): DX 9, AC 5, HD 1, hp 6, AT 1 razor legs for 1d6, SD death stench

        Beneath the sail are a ladle and four sealed clay pots, each filled with pine pitch. (Optional: There is sufficient pitch to re-waterproof the old rowboat in Area 3 (this will take two pots. The pitch must be heated over a fire before application; any character familiar with ships, or even having lived near a coast, will know this.)

        Past the piles, the niche narrows as above for the north niche, and reaches rubble after 10 feet, but here there is just enough space for an unarmored human to squeeze past, and each turn spent clearing has a 2 in 6 chance of enlarging the tunnel enough for an armored character. Beyond this, the tunnel soon turns east and continues to Area 23

    d. East. In this direction, the niche is about fifteen feet above the floor, and the wall leading up to it is smooth and not easily climbed by non-thieves (normal chance for thieves). The niche is only about 5 feet tall and deep, and is empty with several cracks in the back wall. Deep in one crack is wedged a flat unholy symbol of Dagon depicting a humanoid shark, and made of mother-of-pearl (worth 500 gp):


    e. Southeast. This is the largest niche, located at floor level and 10 feet high and deep. A low moaning sound will be heard by anyone standing at the mouth. If a light is shone towards the back, it will reveal that the moaning is emanating from a ten-foot tall figure in a dark grey robe wrapped in ropes, arms raised, standing against the back wall. However, this figure is unmoving, and closer inspection will reveal it to be a statue wrapped in an oilskin canvas, and the moaning to be a trick of wind filtering through tiny cracks in the back of the niche.

        The statue is a warrior sea goddess, made of a finely carved and exquisitely painted wood (cedar), worth 10,000 GP to the right buyer in Portown. The statue is too large to fit through the sea cave entrance (Area 1) or even up the chimney in Area 5. However, being made of cedar means that it is buoyant, and thus could be floated through Areas 8 and 9 and then hauled the rest of the way through the caves to Portown.

    f. South. Another shelf-like niche, similar to the north niche, but about 3 feet off the ground and with a horizontal cast-iron rack lying on it, holding six rusted cutlasses. Five are usable but have a 1 in 6 chance of breaking with each successful hit. The sixth appears similar to the others, but on closer inspection the grip will be noted to be engraved with a pattern of waves. This cutlass of the high tide has magical powers that are activated by immersing it in, or anointing it with, fresh sea water. If such is done, it will become a +1 weapon, +3 versus sea creatures, as well as functioning as a +1 ring of protection. These powers will last for one day, after which it must be dowsed with fresh sea water to activate it again. 

    The back of this niche narrows to a blocked tunnel, similar to the north niche (see above).

    g. Southwest. Another large niche at floor level containing four empty barrels (once holding water, long since evaporated), a few wooden cups, and a rusted ladle. The barrels remain in fair shape and could be used to float through Areas 8 and 9; each will hold a single person.

The only apparent exit from this room is back to the west (the northeast niche conceals a crawlable tunnel that heads east). Follow the links on the above map; if there is no link, the area is not yet posted.

Chronologically on this blog, the previous posted installment was Area 6 and the next posted installment was Area 8.