This is the blog. Click here to go to the Zenopus Archives website.

Note: Many older posts on this blog are missing images, but can be viewed at the corresponding page in the Internet Archive

FEATURED POST

The Forgotten Smugglers' Cave: Index of Posts

An index of posts describing the Forgotten Smugglers' Cave, an adventure for Holmes Basic characters levels 2-4.                    ...

Showing posts with label Tricks and Traps. Show all posts

Wednesday, November 25, 2020

M1 Blizzard Pass: Dungeon Design


Today, Grognardia has a retrospective on the module M1 Blizzard Pass by Zeb Cook.

This brought back some of my memories of this module, which was released in 1983. I remember buying it at Kay-Bee Toys in our local mall on the same day that my sister got the Smurf: Rescue in Gargamel's Castle game for our Colecovision.

I enjoyed the solo module, but what I really found fascinating was the "group adventure" at the end, which describes the dungeon, consisting of the single map shown above, in less than three full pages. Not only is it an interesting behind-the-scenes look at the solo adventure, but it is also a rare example of a TSR "mini-dungeon"; i.e., an adventure consisting of a single dungeon page with just a few pages of description. In the early days, we really only saw this kind of short adventure as a sample dungeon in a rulebook (e.g., Holmes Basic or Moldvay Basic). I think it reminded me of those because it was also in the back of the booklet. One reason I liked this kind of short adventure is that it was closer to the single map-page dungeons I was making myself at the time. Even the adventures published in Dragon magazine were usually longer than this, and had at least two different map pages. 

(Warning, below are some spoilers if you plan to ever play through the dungeon)

As is obvious from the name, the setting for Blizzard Pass is a snowy mountain pass, which immediately gives the dungeon a feel that differentiates from typical sample dungeons. A few of the elements tie into this icy setting, for example, the ogre guard at the beginning that hides in the snow and then hurls "snowballs" (balls of ice) at the party, and the Snow Apes, a new monster.

According to the ten types of Scenarios outlined in Moldvay Basic, the adventure is #8, Rescuing Prisoners - the same as the The Haunted Keep sample dungeon. 

The dungeon itself is more linear than the one in Holmes Basic, but this makes sense as it is a defensible lair. And it has some neat twists that make the linear design more interesting. Two of the paths criss-cross over each other, making the map more eye-catching (see above).

The map also makes good use of the dungeon features key shown on page B58, which was one of the ways that the Moldvay Basic rulebook advanced dungeon design over that of the dungeon of Holmes Basic, as I outlined here. It also has a clever and thematic compass rose that uses the head of troglodyte, one of the monsters in the dungeon.

In addition to the main entrance, there are two other exits from the dungeon. One of these is via a branch point that leads to a red-herring mini-labyrinth in a second part of the dungeon; the other is the requisite secret escape route for the evil cleric, which is a motif that Gygax also used several times (in that post, jump to the section "Evil Human Lair with Escape Route" near the bottom).

It has a few interesting features of verticality; parts of the dungeon are higher than others, which is something also seen in the Caves of Chaos. This allows for a chute that leads from one area to another, a trap that Gygax originally suggested all the way back in OD&D, Vol 3 (e.g., "mouths of chutes" and "a slide to a lower level"), but didn't turn up that often in published dungeons. This trap also involves a weird statue/idol, a motif seen repeatedly in early D&D adventures; there's one in each of the Holmes and Moldvay Sample Dungeons, and Gygax provided several examples in the "Trick and Traps: (Additions)" section of the Greyhawk Supplement.

There is also a vertical passage in the dungeon that can only be traversed by climbing; this allows a thief a chance to use their climb walls ability; the solo adventure itself is written for a thief character. This is shown via a cross-section inset on the map, and leads to the second section of the dungeon. This part is set off visually from the first by use of half-tone dots, labeled on the key as "Higher Area", and perhaps reinforcing that the temperature is different in this part of the cave system.

Plus, it's got pulpy weird toads and apes as the new monsters: the aforementioned Snow Ape and the hypnotic Rock Toad, also called a Cave Toad.

A Rock Toad as illustrated by Jim Holloway

I like this dungeon enough that I included it when I started an annual kids' campaign about five years ago. IIRC, this was the fourth adventure that they went through (Holmes Sample Dungeon -  Mentzer Sample Dungeon - Quest for the Silver Sword - Blizzard Pass).

If you'd like to see this mini-dungeon yourself, Blizzard Pass is available on DMs Guild (note: affiliate link), and it comes with all of the solo entries filled in within the appropriate text so you can actually play through it without the  invisible ink pen.

Read the Grognardia retrospective here:

Retrospective: Blizzard Pass

Yesterday's post about solo wargames reminded me of something that I had almost forgotten: that, in 1983, TSR published the first of two solo adventure modules for Dungeons & Dragons. Entitled Blizzard Pass and written by David Cook, this module is, in broad outline, not all that different from a Fighting Fantasy book like The Warlock of Firetop Mountain.

Thursday, February 13, 2020

Gygaxian Two-Way Secret Doors


Gygaxian Two-Way Secret Door from the AD&D Dungeon Masters Guide (1979)


Over on Facebook, in the Sages of Greyhawk group, James Ward (author of Metamorphosis Alpha and co-author of Gamma World) has been sharing anecdotes about his early games with Gary Gygax. In the first of these he mentioned:
"It wasn't until years later that I found out that sometimes Gary had two chambers connected to one secret door. Depending on if you pressed the right or left side of the door was the chamber you were allowed to enter."
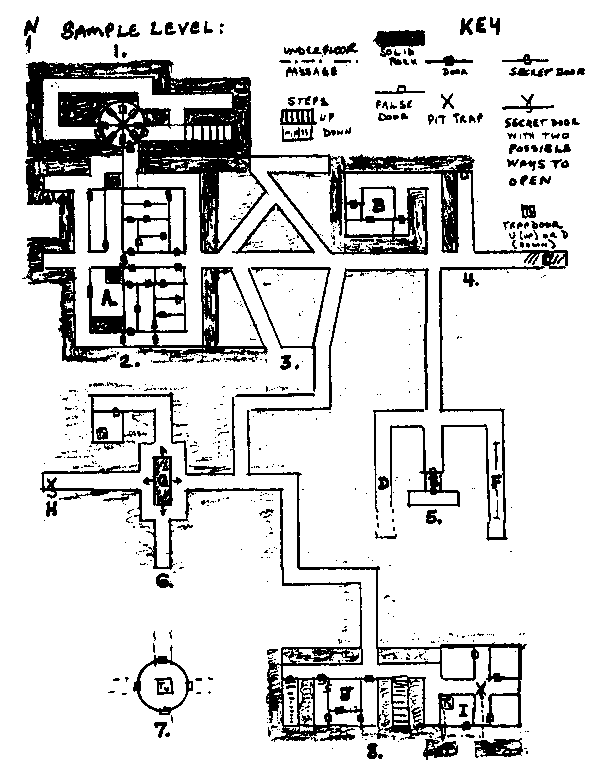
Like many of Gary's favorite dungeon tricks, we were actually warned about these all the way back in 1974 in the original Dungeons & Dragons rules. Specifically, one appears as Area H on the "SAMPLE LEVEL" map in Vol 3, The Underworld and Wilderness Adventures. The corresponding key in the upper right corner of the map shows that the standard secret door symbol with a "V" above it refers to a "secret door with two possible ways to open":


The descriptive text for the dungeon level further explains that:
"Point "H" is a two-way secret door. On a die roll of odd, let us suppose, it opens on a room to the west. Otherwise it opens on a passage south."
So this example differs slightly from the version described by Ward in that it opens randomly in two directions, versus opening in two different directions depending on how it is manipulated.

At least two other variations on these doors appear in the AD&D Dungeon Masters Guide (1979). The first is in the Sample Dungeon (pages 95-96), which describes one where the alternate opening is accessed through use of a key hidden in Room 2:
"Clutched in the bony fingers is the special key which will allow the secret door at location 28. to open to the treasury room (29.) rather than to the steps which lead down to the caverns (steps down at 30.)."
In this situation, if the characters don't find the key they are much more likely to end up in the (presumably) more dangerous second level caverns rather than finding the abbey treasury containing the rumored fire opal.

This secret door is shown in the excerpt of the dungeon map included at the top of this page. There, the secret door is indicated by a standard "S" with a line drawn through it indicating the wall between the two different passages it opens onto.

The second example is in APPENDIX H: TRICKS:
"DOOR, SECRET: This pivoting stone portal will always swing open to the left, giving egress to an area guarded by a basilisk. However, if a second hidden stud is found (1% chance), then it will pivot to the right and allow entry to a chamber containing a magical fountain."
It's a bit unclear here if the DM is simply supposed to roll for the 1% chance when the party is making its first secret door check or whether that is the chance if continued searching is made.

Offhand, I can't think of any others, and a quick search of the Gygax modules didn't turn up anything else. Let me know if you come across any other examples.

See also:
Gygax's Dungeon Delving Level from the Hall of Many Panes, where I look at a number of his other early dungeon traps and tricks.

Monday, December 11, 2017

Gygax's Dungeon Level from Hall of Many Panes


The "Dungeon Delving" map from Hall of Many Pane


I recently found a cheap second-hand copy of the Hall of Many Panes boxed set, a mega-adventure written by Gary Gygax and published by Troll Lord Games in 2005, with dual stats for 3.5E D&D and the Lejendary Adventures (LA) RPG. The Hall was playtested by Gary back in 2002 using LA, his preferred system in his last decade. I was subscribed to his Gygax-Games email list back then and remember his regular play-test reports.

This is my first time owning the final product, so I'd never seen the "Dungeon Delving" Map that was one of the "Many Panes" (Pane 8 / Rose). In the text, Gary describes it at as a "dungeon of the days of yore". Once a party enters via the pane, they are stuck on the level and must explore it thoroughly until they figure out how to leave again.

The published map is a bit of an oddity, as the cartographer seems to have taken a scan of Gary's original map (whatever the source may be), made a negative image out of it, and then drew right over that digitally. The graph from the original paper can be seen in white, as well as many of Gary's notes - some written over completely, some written over partially, and some not written over at all, like the pool in Room 9. The cartographer must have had some trouble following the original notations because, as T. Foster has pointed out, the final map has a number of discrepancies between it and the text of the module.

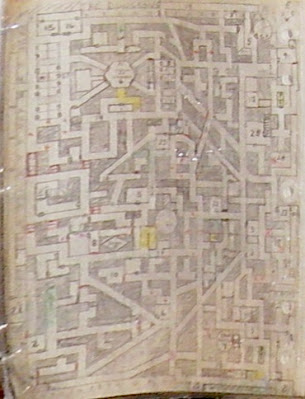
The design is interesting because it's a rare published example in Gary's early style of dungeons, as glimpsed in the tips in OD&D Vol 3, TSR's Dungeon Geomorphs and the unpublished levels of Castle Greyhawk (CG). In the '00s, Gary kept the original castle notes in a binder that he would use to run it at conventions, under OD&D rules, and a few of the levels were photographed by players of these games. The two most well-known images are of Levels 1 and 3, which I've included below for comparison (see also Visualizing Castle Greyhawk). On the whole, "Dungeon Delving" is closest in style to CG Level 3:


Castle Greyhawk Level 3 ("binder" version)


Below is a list of elements in "Dungeon Delving" that are found in Gygax's other dungeons. Note this list contains spoilers if you think you might ever play through Hall of Many Panes.

Diagonal Passages: In "Dungeon Delving" the central START area is an octagonal room similar in design to the hexagonal room in the northern half of Level 3 (see above). In each, a door leads out to a diagonal passage in four directions: NW, NE, SW, SE - essentially an X-shape with a room at the intersection.

Gary's use of diagonal passages was first illustrated way back in the "Sample Level" in OD&D Vol 3; see Area 3 in the image further down this page. The note for this explained, "This area simply illustrates the use of slanting passages to help prevent players from accurately mapping a level (exact deviation from cardinal points is difficult for them to ascertain)."

His "Solo Dungeon Adventures" article in Strategic Review #1 (Spring 1975) is a close relative of these early dungeons, and was later reprinted as Appendix A: Random Dungeon Generation in the Dungeon Masters Guide. In this, Table III: Side Passages includes an entry that the "passage "X's" (if present passage is horizontal or vertical it forms a fifth passage into the "x")".

Diagonal passages and even a few "X-shaped" rooms can also be found in the Dungeon Geomorphs, originally published in 1976-1977, for example in Geomorph A from Set 1:


Geomorph A from Dungeon Geomorphs Set 1: Basic Dungeon (1976)


Room-Labyrinths: A prominent feature of the early dungeons are the maze-like series of empty rooms, which Gygax terms a "room-labyrinth" in OD&D Vol 3. Area 2 of the "Sample Level" illustrates this (see below), with the note stating, "This is a simple room-labyrinth, generally leading nowhere, but "[Room] A would be a room containing a monster and treasure". The section on "Distribution of Monsters and Treasures" further explains, "As a general rule there will be far more uninhabited space on a level than there will be space occupied by monsters, human or otherwise" (page 6). The random distribution instructions that follow give each room a 1-2 in 6 chance of having a monster, which means that on average 33% of the rooms will be occupied. 

The Dungeon Geomorphs are also chock-full of the room-labyrinths (see above). The original notes for the Dungeon Geomorphs restricted this even further: "Approximately 25% of the rooms and large spaces should contain monsters, treasures and other notable items. For every five such rooms there should be approximately one trap. Slanting passages, teleportation areas, slides and the like should be added sparingly thereafter -- one or two such items per level is a fair guideline".


Detail of the map from S1 Tomb of Horrors


Some other less filled-in Gygax dungeons have isolated room-labyrinths. The infamous Tomb of Horrors has a small room-labyrinth south of Area 8. One section of this leads to a false door concealing a spear trap (more on those below), and the other is a series of secret doors (Area 9) leading to the next area of the dungeon (Area 10). His last publication, Castle Zagyg, also has a room-labyrinth (Area 103) consisting of over 30 10' by 10' rooms with 50 (!) different doors, part of the defenses of his beloved Old Guard Kobolds.


Castle Greyhawk Level 1 ("binder" version)


Transporters: "Dungeon Delving" has three different two-way transporters; A1 & A2 are corridor/stair transporters, and B1/2 & B2/1 and B3/4 & B4/3 are two sets of room transporters. The L-shaped A1 & A2 transporters are in a style similar to those on the Level 1 CG map as pointed out by T. Foster here. 

Back in the Tricks and Traps section of OD&D Vol 3, the list of suggestions by Gygax include "Intra-level teleportation area, so that a player will be transported to a similar (or dissimilar area on the same level, possibly activated by touching some items (such as a gem, door, or the like)". The "Sample Level" in OD&D Vol 3 also includes two different examples of transporters, one a two-way room-based transporter, the other a one-way corridor transporter, although neither is explicitly "intra-level". See areas E and F below. 

Likewise, in the original notes for the Dungeon Geomorphs he suggests "putting in areas where those who entered are teleported to a similar spot elsewhere". Tomb of Horrors also has a number of teleporters.


The original version of the OD&D Vol 3 "Sample Level"


Pits: In "Dungeon Delving", the pits are marked with X's and are generally at intersections of corridors, similar to the example in the OD&D "Sample Level". See above, the "X" near Room I. The note for this states,  "Note the pit (X) at the four-way intersection containing a secret door on its south surface" (pg 5). The use of X's to marked covered pits became standard in D&D modules, at least for a time, for example the infamous pit in the Kobold lair in the Caves of Chaos.

The text for "Dungeon Delving" indicates that its pits are of three types, all 10' deep: an unboxed X to indicate an open pit, a boxed X to indicate a covered pit, and a boxed X with a cross-bar to indicate a covered pit with spikes at the bottom. I don't actually note any of the third type on the map itself, which suggests one of the mapping errors noted above.

Arrow/Spear Traps: An "A" on the "Dungeon Delving" map indicates an arrow trap that fires three arrows from the dungeon wall when the square is stepped on. Area 14 also has a more interesting variant on this. 

There are no arrow traps in the OD&D Sample Level, but the sample encounters for the Dungeon Geomorphs Set 1 have one that fires when a door is opened. Arrow and spear traps are part of the line-up in the Trick/Trap Table in "Solo Dungeon Adventures", and are part of the standard line-up in the trap tables in the Dungeon Masters Guide, including Appendix A: Random Dungeon Generation Tables and Appendix G: Traps. Tomb of Horrors has a number of door-triggered spear traps.

Cage Traps: A "C" on the map indicates a "cage trap" where "spike-ended bars fall from the ceiling above to enclose the exit(s) from the place". There are two of these, each opened differently. In the south, one side must be levered a foot off the floor to cause the bars to raise. In the north, a trapped lever near the cage must be pulled to raise it.

OD&D Vol 3 mentions a "return passage blocked by bars", although no other details are given. Appendix G: Traps in the Dungeon Masters Guide includes "Passage, blocked by falling bars". Most famously, the Moat House dungeon in the Village of Hommlet has a hidden grate that will fall to block the exit when a false door is pulled open; it can be raised by use of a hidden winch.

Sloping Passages: Along the NE edge of "Dungeon Delving" is a passage that "slopes up going north 300 feet, so as to bring those traversing it back to the normal level of surrounding dungeon without noticing the incline. Going south the slope is downwards, so as to require the flight of steps up to regain the level of the dungeon proper". This means that if approached from the north, the steps will appear to lead up a level, and if approached from the south, the steps will appear to lead down a level. This is straight out of OD&D Vol 3, which suggests, "Steps which lead to a slanting passage, so the player may actually stay on the same level..." The reverse is also suggested in the Sample Level, where "D" indicates a passage to a lower level with such a gentle slope that "even dwarves won't recognize it".

Carved Face: Area 14 also has a "huge leering face chiseled into the stone wall", reminiscent of other Gygaxian carved faces, including the "great bas-relief face" in the Tricks and Traps list of the Greyhawk Supplement, and of course the Face of the Great Green Devil in the Tomb of Horrors.

Weird Statues: In Dungeon Delving, the START area also has nine statues, a number that reminds me of the infamous room in CG with nine statues - actually imprisoned demigods, later freed by Robilar. The statues here do not similarly house prisoners, but are important to solving the dungeon level. The use of weird statues was suggested in several of the "Trick and Traps: (Additions)" found in the Greyhawk Supplement.

Evil Human Lair with Escape Route: Room 17 of "Dungeon Delving" is called the "Jolly Priest" and is home to an evil priest masquerading as good, ala the "jovial priest" in the Keep on the Borderlands. The description includes his plans for escape via a secret door and nearby passages, which is another design element Gygax often included in his dungeons. 

In the note for Area 8 of the OD&D Sample Level, "The western portion contains the room of some evil man [Room J], complete with two secret doors for handy escape". Likewise, the evil priest in the Caves of Chaos has a secret escape door from his chamber in Area K. And in the evocative yet incomplete DMG Sample Dungeon, the Wandering Monster Table indicates an evil cleric lairs in Areas 35-37, which contain two concealed doors - presumably an escape route.

See also: Gygax's Playtest Reports for the "Dungeon Delving" Level from HoMP